Available Light Photography
Photography needs light. Without it, there would be no picture. On the other hand, having more of it doesnt necessarily produce better pictures.
Actually, some of the most interesting photos can be taken in low-light situations - at dawn, in the evening, at night or in dark rooms.
That ray of light filtering through the trees of a wood or falling on the face of a person sitting in the dark is much more effective than broad daylight.
But: how to capture high-quality pictures when its dark?
There are just a few options:
- use a fast (highly sensitive) film or push develop your usual film (you should try that out beforehand...
- if you have a digital camera: set your ISO setting to a higher than normal value
- use a flash
- use other additional light sources like spots, or a reflector
- use a fast lens
- use a tripod
Fast Films
Isnt this perfect? You just use a different type of film and you can shoot away as usual. Well, in a way thats true, but, of course, the higher speed has its price (otherwise, wed all be using 800 ASA film most of the time...). Not in terms of money but in terms of resolution: high-speed films are grainier and less saturated than normal films (did I mention that my favourite film is Fuji Velvia, which has 50 ASA?).
This may even enhance some photos - but it takes a bit of experience to predict where this is the case.
Push development means that you use your normal film but manually set the camera to a different ISO setting. Upon coming back, you ask your lab to push develop the film at the higher setting. Some films can be easily pushed, others not. Results vary and it is wise to try this at home rather than at a remote travel destination.
Oh, and make sure to reset the camera for the next film, if it doesnt do this automatically...
ISO-setting
See above. Theres no escaping the laws of physics. However, digital cameras at least allow you to see the result immediately...
Using a Flash
I wrote another section on this. However, with night photography, there are some interesting additional options. For example, you can put your camera on a tripod set it to bulb, walk around and use the test function of your detachable flash to illuminate certain parts of a big object, - like a building.
Professional camera systems also often offer a way to trigger several flashes at the same time - either controlled by the inbuilt camera flash, or cables or a remote control.
Another nice effect is using coloured filters on your flash, thereby illuminating the scene with blue, green or red light (or a combination of several colours).
Still, I think the main application of a flash is to illuminate the foreground in order to reduce the contrast with a brighter background (fill flash)
Lamps and Reflectors
Spots and lamps are indispensable for studio photography, but you usually wont have them with you while travelling.
On the other hand, a collapsable reflector or even a pocket mirror may give you the chance to shine some additional light on a detail in the shade.
Fast lenses and anti-shake
Fast lenses allow you to take sharp pictures when other people have to use a tripod. You can take a picture inside a church, inside a museum or at a theatre performance without using a flash (very often inside such buildings, photographing is allowed, but not the use of flash or tripods).
Just as for other things, theres a price tag attached to this:
- yes, fast lenses are more expensive
- a fast lens only allows you to take pictures in the dark because you can open it more than a slower model. This means that you are dealing with a wide-open aperture. Thus, the resulting photos will have very little depth of field. Good if you have a subject that you want to separate from an unimportant background, but a problem for shots where you would like to show foreground and background tack sharp.
Anti-shake systems avoid that problem.
Tripods
my preferred way of taking pictures in the dark: I use a slow film (Fuji Velvia), put my camera on a tripod, set the camera to auto trigger or use a remote control and bracket. This usually results in very saturated pictures. Beautiful for landscapes and city panoramas, the only problem being that any movement will be blurred.
Another factor to consider is an esoteric concept called reciprocity failure. Normally, you can easily make use of different combinations of exposure time and aperture. The total amount of light will be the same, but the background will be more or less blurred (the smaller the aperture, the greater the depth of field...).
This can be easily predicted and many cameras provide you with a simple way of selecting different combinations. However, for very long exposure times, the film behaves differently and doubling the exposure time will not make the image twice as bright. Here you have to voluntarily overexpose your photo.
Unfortunately, different films behave differently here, so the best approach is to take many pictures with different settings (bracketing).
Some other hints: with very long exposure times, its often best to close the view finder before pulling the trigger. And: a small flashlight comes in very handy when you want to put in a new film, change your lens, or check whether you have put all equipment back into your bag...
Examples: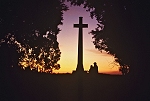
Lovers under a cross. Taken with a 1:1.4 50 mm Minolta lens on 100 ASA Film.
Pharaohs head. Camera put on a wall and set to auto timer. Fujichrome Velvia (50 ASA). Over-exposed by 1 or 2 stops.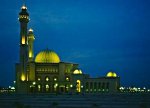
Mosque at sunset. Camera mounted on a small tripod, fast lens (1:1.4 50 mm).
Automatic exposure.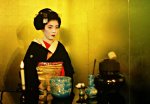
Geisha performing tea Ceremony in Kyoto Japan. Camera set to slow flash synchronisation (to capture as much ambient light as possible), Fill flash.